Projeto jammer builds pair an ESP32 microcontroller with nRF24L01 transceivers to flood the 2.4 GHz band and demonstrate how easily Wi-Fi, Bluetooth, and BLE links can be disrupted. Here is how the hardware, firmware, open-source projects, and legal limits actually fit together.
What Is a Projeto Jammer and What Does It Do?
A projeto jammer is a project where you build a device that deliberately emits radio frequency interference to disrupt wireless communications. You'll mostly run into the term in DIY and student engineering circles, where the point is education rather than deployment: wire up an ESP32 microcontroller with nRF24L01 transceivers, flood the 2.4 GHz band with noise, and watch packet loss and denial of service hit Wi-Fi, Bluetooth, and BLE devices in range. ScienceDirect defines a jammer simply as a device that intentionally emits signals to break communication systems, and honestly, that's the right place to start for every build described below.
What makes these projects so tempting is that the parts are cheap and the ideas behind them are legit. Bluetooth runs on the 2.4 GHz ISM band—the same chunk of spectrum Wi-Fi and microwave ovens use—so with one low-cost radio chain you can show off interference, channel flooding, and the weaknesses of Frequency Hopping Spread Spectrum in a single afternoon. But let's be clear about what these builds aren't: they're weak. A DIY version sits nowhere near a commercial or military jammer in terms of range and output power. For some perspective, Dataintelo valued the military jammer market at $9.4 billion in 2025 and expects it to hit $17.8 billion by 2034, a CAGR of 7.4%. That's the scale that makes hobby hardware look like exactly what it is.
Terminology really matters when you're hunting for parts or digging through documentation. You'll run into signal jammer, RF jammer, Bluetooth jammer, BLE jammer, WiFi jammer, 2.4 GHz jammer, frequency jammer, drone jammer, multiband jammer, jammer detector, and jamming—and people tend to use them almost interchangeably. Just watch out for one thing: Global Game Jam 2024 pulled together 34,649 "Jammers" across 796 sites in 102 countries. That's a totally different meaning of the word, and it'll clog up your search results if what you're actually after is RF hardware.
How Does an ESP32 and nRF24L01 Jammer Work?
At its core, a jammer works through radio frequency interference. It floods the channels that a given protocol depends on, so legitimate packets keep colliding, getting retransmitted, and eventually dropping off entirely. The result is denial of service, and none of it requires breaking encryption. Bluetooth Classic spreads its traffic across 79 channels near 2.45 GHz, hopping frequencies 1,600 times per second, while BLE gets by with 40 channels and adaptive frequency hopping. That hopping behavior, known as FHSS, is basically the defense here: since the link never stays in one place, a jammer has to cover enough of the band, at enough power, just to keep pace.
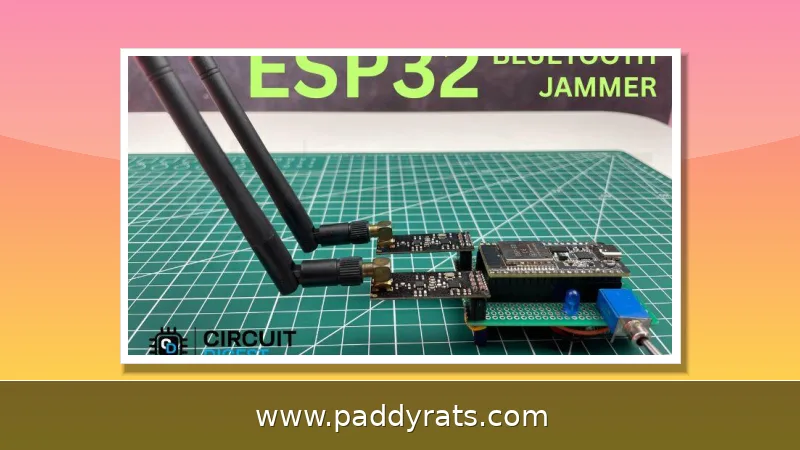
So how does an ESP32 Bluetooth jammer actually pull this off? It relies on dual NRF24L01 PA+LNA modules, with one running over HSPI and the other over VSPI, both blasting RF noise across the 2.4 GHz band. Since the two radios are controlled independently, the firmware can send parallel data packets across multiple channels rather than sweeping through them one at a time. That wider spread improves coverage and makes it more likely the jammer catches Bluetooth mid-hop. If you want a solid reference, CircuitDigest published an ESP32 Bluetooth Jammer using dual NRF24L01 modules on April 13, 2026, and it includes a circuit diagram, a pin connection table, firmware flashing instructions, and a video demo. It's still one of the clearest public walkthroughs of the concept out there.
Back in 2020, Anshika Nijhawan, Saket Bhatnagar, and Govind Sharma put together a WiFi jammer as a student project, running it from August through December for their 5th semester of a Bachelor of Computer Applications program. Another build took a similar approach but paired an ESP32 with NRF24L01 modules and the Arduino IDE, with a total cost of around 35,000 IQD. The goal there was to stop students from cheating with Bluetooth earpieces. It's a pretty telling example of how fast an educational demo can turn into a policy question.
Detection research has been moving right alongside jamming research. There's published work on statistical indices, hardware-based detection methods, machine learning approaches for classifying jammers in GNSS bands, and techniques for estimating jammer types in LTE by looking at the number of Connected mode UEs. So if you're putting together something for a class or a lab, spend some time with the detection literature before you start writing. It'll give your paper way more depth than just showing a clip of a Wi-Fi network going down.
Why Use Dual nRF24L01 Modules and HSPI/VSPI?
The whole reason for running two nRF24L01 modules is that each one gets its own control path through the ESP32's HSPI and VSPI interfaces, so neither radio has to wait on the other. A single module can only switch channels one at a time, which means it's always playing catch-up. Pair them up, though, and you can push parallel data packets across multiple channels at once, which widens your coverage and makes the whole setup perform noticeably better. That matters a lot in a band where the target hops 1,600 times per second. With that kind of speed, parallelism isn't just a nice bonus, it's what separates a jammer that occasionally clips a packet from one that consistently degrades the link.
The downside is that you're signing up for more wiring and firmware headaches. SPI routing has to be clean, the 3.3 V supply needs to stay stable, and you have to leave enough current headroom for PA+LNA modules—they pull noticeably more juice than bare radios do. Antennas are another thing to think through: RF-Clown runs 4x IPEX cables with 8 dBi antennas, while Project Starbeam stacks up to five NRF24L01+ 2.4 GHz modules with PA+LNA next to as many as two CC1101 radios covering 300–928 MHz. The table below breaks down how these two well-known open-source builds stack up against each other on radio configuration.
| Build | Radios | Coverage | Display and extras |
|---|---|---|---|
| RF-Clown | Triple NRF24 (GT24 Mini) | 2.4 GHz, 4x IPEX + 8 dBi antennas | OLED, 3 tactile switches, NeoPixel, TP4056 lithium charging, CP2102, LF33 regulator |
| Project Starbeam v2 | Up to 5x NRF24L01+ PA+LNA, up to 2x CC1101 | 2.4 GHz plus 300-928 MHz, up to 6 GHz with HackRF One | SSD1306 OLED 128x64 I2C, 4-layer PCB, ESP32-WROOM-32D |
Looking at that table, one thing becomes pretty obvious: adding more radios means you can cover more channels at once, but you also have to deal with a bigger power budget, more board space, and extra firmware that all has to stay in sync. When you pair Project Starbeam with a HackRF One, its frequency coverage stretches up to 6 GHz, which pushes it beyond a simple 2.4 GHz demo and closer to a real signal intelligence platform. That said, if you're building your first jammer, sticking with dual NRF24L01 modules on HSPI and VSPI is still the smartest way to start.
Open-Source Jammer Projects: RF-Clown and Project Starbeam
RF-Clown is an open-source BLE and Bluetooth jammer built around nRF24L01 radios and an ESP32, released under the MIT License with 1.9k stars, 43 watching, and 192 forks on GitHub. The project is maintained by CiferTech, which also publishes on Hackster.io and Patreon, and the hardware spec includes triple NRF24 GT24 Mini modules, 4x IPEX cables with 8 dBi antennas, an OLED display with three tactile switches, NeoPixel feedback, a lithium battery with TP4056 charger, onboard CP2102, an LF33 voltage regulator, and ESP32 Board Version 1.0.5.
Project Starbeam v2 is described by its author, dkyazzentwatwa (littlehakr), as the ultimate ESP32 WiFi + BT + Drone Jammer with 5 radios. It uses an ESP32-WROOM-32D running a 240 MHz dual-core with 4MB flash and 520KB SRAM, an SSD1306 OLED 128x64 I2C display, up to 5x NRF24L01+ 2.4 GHz PA+LNA modules, up to 2x CC1101 300-928 MHz modules, and a 4-layer PCB. It is distributed through GitHub, PCBWay, and the Hakr Hardware Club on whop.com, and the author frames it as an affordable approach to signal intelligence for security applications.
The comparison that matters here is philosophical rather than purely technical. RF-Clown emphasizes transparency and education versus closed-source implementations, which makes it the better teaching artifact. Project Starbeam pushes toward capability and range, which makes it the better platform for authorized security testing. Both sit in the same legal category, and both are low-cost relative to commercial or military jammers, with correspondingly limited range and power.
Hardware, Firmware Flashing, and Build Steps
Firmware flashing is where most first-time builders get stuck, so it is worth treating as its own skill. The standard toolchain is the ESP32 Flash Download Tool plus the CP210x USB to UART Bridge VCP Drivers. The .bin file goes in at start address 0x1000, the chip type is ESP32, the COM port is whatever the board enumerates as, and the baud rate is 115200. After clicking Start, verify the upload before you connect antennas or a battery.
The CircuitDigest build walks through components required, circuit diagram, pin connection table, hardware assembly, flashing firmware, a video demonstration, HSPI and VSPI explanation, and troubleshooting in that order, which is a sensible sequence to copy. The RF-Clown process is narrower: download the ESP32 Flash Download Tool and USB drivers, prepare the .bin file, connect the ESP32 over USB, select chip type ESP32, add the .bin at 0x1000, select the COM port and 115200 baud, click Start, then verify the upload.
Project Starbeam assembly adds a sourcing step because of the 4-layer PCB. You order the board, attach the ESP32-WROOM-32D, SSD1306 display, NRF24 radios, CC1101 radios, and USB-C module, install the Arduino IDE, add SmartRC-CC1101-Driver-Lib2 to the libraries folder, open starbeam_v2.ino, upload the code, and only then attach antennas. A separate Instructables guide on a DIY signal jammer for drones, Wi-Fi, and 4G published October 14, 2024 begins by extracting a high-voltage module and then designing and ordering a PCB, a reminder that not every build in this space stays at 3.3 V logic levels.
| Step | Action | Key setting |
|---|---|---|
| 1 | Install ESP32 Flash Download Tool and CP210x drivers | Windows VCP driver |
| 2 | Connect board over USB and identify COM port | Baud rate 115200 |
| 3 | Load .bin file and select chip type | Start address 0x1000, chip ESP32 |
| 4 | Click Start and verify the upload | Confirm success message |
| 5 | Attach antennas and power source | Only after a clean flash |
Multiband designs raise the difficulty again. One multiband jammer project used the 900-1900 MHz band covering GSM900, GPS, and GSM1800, while CAST-Jammer lists output frequencies on L1, L2, and L5. Those are GNSS bands, and the detection research on jammer classification in GNSS bands exists precisely because interference there has real-world consequences. If your interest is learning RF, stay on 2.4 GHz with an ESP32 and nRF24L01 and leave the GNSS hardware to licensed labs.
Is Building a Signal Jammer Legal?
No, not in general use. Project Starbeam states plainly that it is designed for authorized security testing only. Unauthorized RF jamming, WiFi deauthentication, or network analysis may violate the Computer Fraud and Abuse Act (CFAA), FCC regulations, and similar laws in other jurisdictions. Users are solely responsible for compliance and should only test networks they own or have written authorization for. That is not boilerplate; it is the single most important sentence in this entire topic.
The compliance picture has three layers. First, transmitting on licensed or protected spectrum is regulated regardless of intent. Second, interfering with communications you do not own can trigger both civil and criminal exposure. Third, possession and sale rules vary by country, so hardware that ships legally to one address may be restricted at another. Educational content, open-source licenses like MIT, and classroom assignments do not create an exemption from any of these.
The responsible version of this hobby looks like a shielded enclosure or Faraday setup, a lab or classroom with an instructor, written authorization from whoever owns the network, and documentation of the test scope and time window. The military and commercial jammer market operates under procurement and licensing frameworks that hobbyists simply do not have access to, and the gap between a $40 ESP32 build and a $9.4 billion market is mostly legal and engineering rigor, not enthusiasm.
There is also a practical limitation worth stating. DIY builds are low-cost but limited in range and power compared with commercial or military jammers, so the realistic outcome of an unauthorized test is not a dramatic takedown but interference with neighbors, emergency services, or your own devices, plus legal risk. Build it to understand FHSS, packet loss, and denial of service, then keep it powered down outside an authorized setting.
What Should You Learn From a Projeto Jammer Build?
The durable value of a projeto jammer project is the RF literacy it forces on you. You learn why Bluetooth hops, why BLE's 40 channels with adaptive frequency hopping behave differently from Bluetooth Classic's 79 channels at 1,600 hops per second, why antenna gain and cable loss matter as much as transmit power, and why denial of service is a spectrum problem rather than a cryptography problem. Those lessons transfer directly to Wi-Fi troubleshooting, IoT security reviews, and wireless certification study.
The open-source ecosystem makes that learning accessible. RF-Clown gives you a transparent, MIT-licensed reference with a documented board version, and Project Starbeam shows what happens when you scale radios, add CC1101 coverage, and move to a 4-layer PCB. CircuitDigest's dual-module walkthrough from April 13, 2026 gives you a step-by-step path with a video demo, and the Instructables drone, Wi-Fi, and 4G guide from October 14, 2024 shows the higher-voltage end of the spectrum.
If you want a defensible project outcome, aim for a written report rather than a working jammer. Measure packet loss at fixed distances, compare single-radio versus dual-radio configurations, log which channels degrade first, and cite detection research on statistical indices and machine learning classification. That turns a legally fraught gadget into a legitimate wireless security study, and it is the version of this project that will still look good on a resume years from now.
Frequently Asked Questions
What is a projeto jammer?
A projeto jammer is a project that builds a device deliberately emitting radio frequency interference to disrupt wireless communications. Common builds use an ESP32 microcontroller with nRF24L01 transceivers to flood the 2.4 GHz band, causing packet loss and denial of service for Wi-Fi, Bluetooth, and BLE devices in range.
How does an ESP32 Bluetooth jammer work?
An ESP32 controls two nRF24L01 PA+LNA modules, one on HSPI and one on VSPI, broadcasting RF noise across the 2.4 GHz band. This floods the channels Bluetooth relies on, causing packet loss and connection instability, and demonstrates Frequency Hopping Spread Spectrum vulnerability in a controlled educational experiment.
Why use two nRF24L01 modules in a jammer?
Using two nRF24L01 modules lets each be controlled independently through the ESP32's HSPI and VSPI interfaces. The system can generate parallel data packets across multiple channels, increasing coverage and performance compared with a single radio module, at the cost of more wiring, power budget, and firmware complexity.
Is building a signal jammer legal?
Project Starbeam states it is designed for authorized security testing only. Unauthorized RF jamming, WiFi deauthentication, or network analysis may violate the Computer Fraud and Abuse Act (CFAA), FCC regulations, and similar laws. Users are solely responsible for compliance and should only test networks they own or have written authorization for.
What is a Projeto Jammer and what does it do?
A Projeto Jammer is a DIY project that builds a device deliberately emitting radio frequency interference to disrupt wireless communications. Typically, it pairs an ESP32 microcontroller with nRF24L01 transceivers to flood the 2.4 GHz band, causing packet loss and denial of service for Wi-Fi, Bluetooth, and BLE devices within range. These builds are educational and low-power compared to commercial or military jammers.
How does an ESP32 and nRF24L01 jammer work?
The jammer floods the channels a protocol depends on with RF noise, so legitimate packets collide and drop. Bluetooth Classic hops across 79 channels 1,600 times per second, while BLE uses 40 channels with adaptive hopping. Dual nRF24L01 modules on HSPI and VSPI allow parallel packet transmission across multiple channels, increasing the odds of disrupting frequency hopping spread spectrum links.