A hands-on look at how DIY RF, Wi-Fi, Bluetooth, and GSM jammers are built, what parts they use, and why the FCC says building or selling one is illegal in the US.
How Does a Signal Jammer Work?
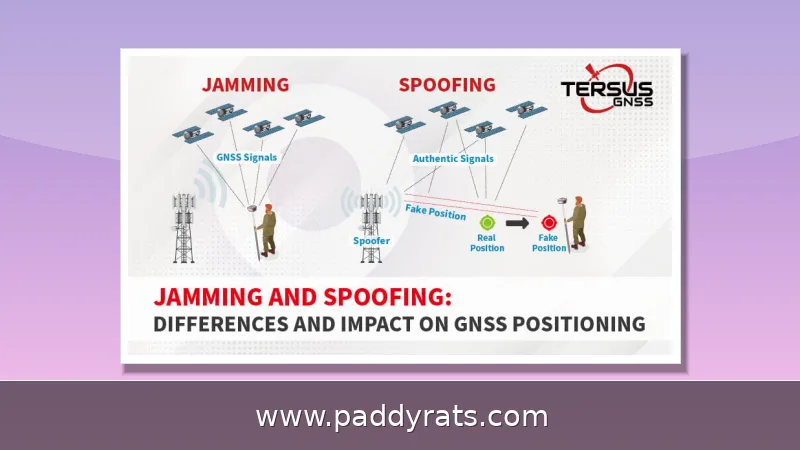
A signal jammer isn't some kind of hacking tool that breaks into your phone or cracks its encryption. All it really does is blast radio frequency noise on the same bands a device is already using, and that noise is loud enough to drown out the real signal. Cell traffic travels on 700MHz, 800MHz, 900MHz, 1800MHz, 1900MHz, and 2100MHz, GPS hangs around 1575MHz, and Wi-Fi runs at 2.4GHz and 5GHz. Once you flood any one of those windows with enough RF energy, the phone, tracker, or drone simply loses its connection.
The principle at work here is brute force, not finesse. A jammer doesn't crack a network or intercept a handshake — it just shouts over everyone else, flooding the target frequency with radio noise strong enough that a handset can't pick out the legitimate signal underneath. That's why even a fairly basic phone jammer circuit can take down UMTS, 3G, CDMA, GSM, and PHS all at once: those standards all live in the same crowded slice of spectrum, so one blast of interference wipes them out together. More sophisticated commercial units take a smarter route, known as protocol jamming, that goes straight after the control channels phones and towers use to negotiate a connection. By disrupting that conversation instead of drowning the whole band, they can silence a device with noticeably less raw power. Drone jammers run the same play against the control links between pilot and aircraft, which is why a targeted blast doesn't just cut the video feed — it pushes the drone into its failsafe behavior, whether that means hovering in place, drifting, or turning around and flying back to where it launched. And when the goal is covering as much ground as possible, wide-band full spectrum jammers skip precision altogether and simply block several bands at the same time.
Range is the part most hobbyists underestimate, and it's usually where a first build lets you down. A basic jammer circuit can sweep roughly 50 MHz to 1 GHz and take out signals across 5 to 10 meters, which sounds fine until you try to stretch it further. Push that same circuit to jam from a 500 MHz span and stability tends to fall apart — the tuning drifts, the output drops, and you end up chasing ghosts instead of blocking anything. Antennas are the other lever you can pull. Move up to a 2-meter antenna and the spark length can climb to about 8mm, which pushes your effective range to 10-15 meters, with VHF noise showing up strongest at 8-10 meters. Think of it like a flashlight: a wider beam covers more ground but doesn't throw as far, and a bigger antenna is basically the reflector that tightens the beam up. Just keep in mind none of this matters legally, which I'll get to later.
What Components Do You Need for a DIY Jammer?
Almost every beginner build follows the same basic blueprint: you've got an Arduino or ESP32 acting as the signal source, an RF module like a 433MHz transmitter or an NRF24L01, a transistor to handle amplification, plus capacitors, an inductor, and an antenna. If you're putting together a cell phone jammer circuit, it really comes down to three subcircuits that have to work in tandem — an RF amplifier, a voltage controlled oscillator, and a tuning circuit. Leave out even one of those and you're not building a jammer anymore, you're just building something that heats up.
Building a basic cell phone jammer doesn't require a huge pile of parts—what matters is getting a small set of them right. R1 takes care of emitter loading, and R2 sets the base biasing so the transistor stage stays operating where it's supposed to. Each capacitor has its own role: C1 generates the frequency, C2 and C3 supply the feedback that keeps the oscillation going, C4 reduces noise, C5 and C6 handle coupling, and C7 decouples the stages from unwanted interference. Then Q1 amplifies the signal, and L1 is the component that actually produces the frequency. It's a tight little design, but every value counts. One documented build locked onto a 450MHz tuning frequency and successfully blocked cell phone signals, which proves the approach works in the real world. The good news is that other frequency ranges follow the same blueprint—once you grasp how these parts interact, you can retune the circuit for different bands instead of starting over from scratch.
| Component | Role in the Circuit |
|---|---|
| R1 | Emitter loading |
| R2 | Base biasing |
| C1 | Frequency generation |
| C2, C3 | Feedback |
| C4 | Noise reduction |
| C5, C6 | Coupling |
| C7 | Decoupling |
| Q1 | Amplification |
| L1 | Frequency generation |
If soldering isn't your thing, SDR-based builds might be a better fit. You can put together a working GSM RF jammer using GnuRadio and PlutoSDR — the software handles the waveform, and the PlutoSDR takes care of transmitting. No hand-wound coils, no trimmer tuning. For Bluetooth and BLE, the ESP32-BlueJammer follows a similar modular idea: an ESP32 paired with dual NRF24L01 modules covers Bluetooth, BLE, Wi-Fi, and RC channels in one compact package. If you want the cheapest way in, the Arduino 433 MHz jammer wins — just an Arduino and a 433 RF module running at 12 Volts, with the Arduino generating a single square wave that feeds the RF module. That said, plenty of builders still stick with the NE555 timer for DIY cell phone jammers, preferring the old-school analog approach over a microcontroller.
| Build | Core Parts | Target Bands |
|---|---|---|
| Arduino 433 MHz jammer | Arduino, 433 RF module, 12V supply | 433 MHz ISM |
| ESP32-BlueJammer | ESP32, dual NRF24L01 | Bluetooth, BLE, Wi-Fi, RC |
| SDR GSM jammer | GnuRadio, PlutoSDR | GSM 900/1800 |
| Cell phone jammer circuit | RF amp, VCO, tuning circuit, Q1, L1 | 450 MHz to 2100 MHz |
| Multiband jammer | 900-1900 MHz band hardware | GSM900, GPS, GSM1800 |
The table above is a rough map, not a shopping list. It shows you which bands exist and roughly what hardware touches them, but it doesn't say anything about how much work each row actually demands. Take the contrast here: the multiband project covered GSM900, GPS, and GSM1800 all at once with a single 900–1900 MHz band, simply because one wide swath of noise happened to overlap all three. The phone jammer circuit, on the other hand, needed a tuned VCO that could sit on one frequency at a time and stay there. Neither approach is wrong—they just solve different problems. The multiband build trades precision for reach, while the single-band design trades reach for a clean, stable tone. You'll run into that same tradeoff between coverage and stability in every build, whether you're winding coils by hand or wiring up an SDR. It's also the main reason wide-band full spectrum jammers cost so much more than a single-band kit.
How to Build a Cell Phone Signal Jammer Circuit
The RF jammer build sequence is pretty much the same no matter which guide you follow, and honestly, that consistency tells you something—the order isn't arbitrary. You start with the driver circuit, because every other stage depends on it working first. Then you prepare the flyback, wrapping it around a rigid paper cylinder and gluing it in place, and you set the ferrite cores with plastic plates sandwiched between them to keep ultrasound vibrations down. After that, you input the antenna, and only then do you peak the resonance. That final step is the one most people rush past, and it's also the one that makes or breaks the whole build. An untuned circuit will still hum along and look busy, but it won't actually jam anything. Peaking the resonance is what lines your output up with the frequency you're really going after, so think of it as the finish line, not some optional tweak you can skip.
Component choices matter more than you'd think, and the little details you settle on here often determine whether your build runs cool and stable or drifts and eventually dies. For this kind of project, the standard coil spec is 1 mm thickness paired with 0.1 mm magnetic wire, and presoaking the coil in paraffin wax helps keep the windings in place, though epoxy holds up better against melting once things start heating up. Your secondary coil should produce 8–9 mm sparks, and to get that reliably you'll need a 20W power supply behind it. It's also worth throwing in a fast diode to protect the transistor from voltage surges, and a fairly large heatsink will keep the switching stage from cooking itself. One last thing: use screws rather than solder for the flyback primary and secondary coils, so you can take the build apart and service it later instead of scrapping the whole assembly.
Tuning is where most first attempts fall apart, and it's rarely because the circuit itself is wrong — it's because the builder skipped this step or rushed through it. Start by attaching a 0–10V DC voltmeter across the output, then slowly turn the 22pF trimmer until the reading peaks at a maximum of 3V. That peak is your resonance point, but it's not where you want to stay. Back the trimmer off a little and fine-tune down to the actual frequency you're targeting. This peak-then-back-off routine is what separates a circuit that genuinely blocks a carrier from one that just wastes current and runs hot. In one documented build, a 450MHz tuning frequency successfully blocked cell phone signals, and the same tuning logic applies at other frequencies — only the trimmer values and target band change. Skip the voltmeter and you're basically guessing.
| Tuning Step | Action | Target Reading |
|---|---|---|
| 1. Connect meter | Attach 0–10V DC voltmeter to output | — |
| 2. Find peak | Adjust 22pF trimmer for maximum output | 3V max |
| 3. Back off | Fine-tune trimmer back to proper frequency | Target frequency (e.g., 450MHz) |
How to Build an Arduino 433 MHz Jammer
The Arduino 433 MHz jammer is the entry point I would point a curious beginner toward, because the parts are cheap and the wiring is trivial. You need an Arduino and a 433 RF module, powered at 12 Volts. The Arduino generates one square wave that feeds the RF module, and that is the whole signal chain. No VCO, no trimmer, no flyback transformer.
The catch is that a single square wave is a blunt instrument. It produces noise across a narrow slice of the 433 MHz ISM band, which is enough to disrupt simple remote controls, sensors, and unshielded receivers nearby, but it will not touch a phone on 700MHz or a drone on 2.4GHz. Range is modest and heavily dependent on antenna quality and line of sight.
If you want more coverage from the same platform, the ESP32 route is the natural upgrade. The ESP32-BlueJammer uses an ESP32 with dual NRF24L01 modules for Bluetooth, BLE, Wi-Fi, and RC jamming, and the community around it has published YouTube walkthroughs showing the full assembly. It is still a fixed-band tool, but it covers far more consumer devices than a bare 433 MHz module ever will.
How to Build a DIY Jammer for Drones, Wi-Fi, and 4G
Drone jamming is a different problem than phone jamming. A drone jammer overwhelms the control link so the aircraft enters failsafe mode, hovering or returning to launch rather than falling out of the sky. That is why purpose-built drone jammers target only drone frequencies instead of blanketing everything, which minimizes disruption to nearby Wi-Fi and cellular traffic. The commercial Drone UAV Signal Jammer JM004 sells for $2,399.99, a price that reflects the targeting precision, not just the power output.
Wi-Fi and cellular builds follow the same logic. WiFi jammers block 2.4GHz and 5GHz, while cell phone jammers block 700MHz to 2100MHz. A multiband jammer project used a 900-1900 MHz band covering GSM900, GPS, and GSM1800 in one unit. Portable jammers are small, battery-powered, and cordless, which makes them useful for a small room or a vehicle, while fixed installations trade mobility for range.
| Model | Target | Price |
|---|---|---|
| 4G Phone Jammer JM021 | 4G cellular bands | $520.00 |
| Drone UAV Signal Jammer JM004 | Drone control links | $2,399.99 |
| Handheld WiFi Bluetooth Jammer JM012 | 2.4GHz Wi-Fi, Bluetooth | $569.99 |
| Handheld Mobile Phone Jammer JM018 | 16 antennas, 25 meters | $699.00 |
Those prices are worth sitting with. The gap between a $520 phone jammer and a $2,399.99 drone jammer is not marketing fluff; it reflects how much harder it is to hit a narrow control band reliably at distance. The limitations are real too. Jammers only block certain frequency bands and the carriers that actually operate in a region, so a unit built for one market may be useless in another, such as Nigeria, where the deployed bands differ. RF jammers may also fail to cover other frequencies without retuning.
How to Build a GSM RF Jammer Using SDR
Software defined radio changed the DIY jamming landscape more than any single hardware kit. A working GSM RF jammer can be built with GnuRadio and PlutoSDR, which means the frequency, waveform, and timing all live in software rather than in a hand-wound coil. You can retune from GSM900 to GSM1800 by editing a flowgraph instead of rewinding a transformer.
The tradeoff is that SDR puts the complexity in a different place. You need to understand sample rates, gain staging, and filtering well enough to avoid splattering energy across bands you did not intend to touch. GnuRadio gives you the blocks, and PlutoSDR gives you the transmit chain, but neither one protects you from a badly designed flowgraph. Community walkthroughs on YouTube cover GSM RF jammer builds using SDR, and they are a reasonable starting point for understanding the signal chain.
For anyone who wants to study interference rather than cause it, the same SDR toolchain can be pointed at detection. J911 research describes GPS jam-to-noise (J/N) ratio detectors for interference detection and localization, and a jammer detector can be built to identify interference without transmitting anything at all. That is the version of this hobby I can actually recommend.
Is Building a Signal Jammer Legal?
No, not in the United States. The FCC states it is a violation of federal law to use or sell cell jammers or similar devices that block authorized radio communications such as cell phones, police radar, GPS, and Wi-Fi. Consumers cannot legally use jammers in the United States, and retailers cannot lawfully sell them either. The stated reason is public safety: blocking a call or a GPS fix can prevent someone from reaching emergency services.
Many other countries restrict jammers on the same grounds, and enforcement is not theoretical. Selling a device is just as actionable as using one, which is why the commercial models listed above are marketed to markets where they are permitted, not to US buyers. If your interest is in radio frequency engineering, direction finding, or interference detection, there are legal paths into all three. Building a transmitter that deliberately blocks licensed spectrum is not one of them.
This is not investment advice, and it is not legal advice either. If you are considering buying or building any device described here, talk to a qualified attorney in your jurisdiction before you spend a dollar. The technical material is widely documented, but documentation is not permission.
What Are the Risks and Limitations of DIY Jammers?
The practical limitations show up before the legal ones. A homemade jammer only blocks the specific bands it was tuned for, and cellular carriers in a given region may operate on frequencies your build never touches. Coverage claims of 5 to 10 meters for a simple circuit are optimistic in a building with walls, and pushing a circuit to jam from a 500 MHz range tends to introduce stability issues rather than more range.
Heat and component stress are the other failure mode. Flyback-based designs run hot, which is why a relatively large heatsink and a fast diode to shield the transistor from voltage surge are not optional. Coil construction matters too: 1mm thickness with 0.1 mm magnetic wire, presoaked in paraffin wax, or epoxied for better melt resistance. Even then, a 20W power supply is the minimum for the secondary coil to deliver 8-9 mm sparks.
Sources on this topic range from 2010 to 2026, and the field has shifted noticeably toward SDR and microcontroller builds. A DIY RF jammer PCB guide was last modified on July 2, 2026. A DIY signal jammer guide covering drones, Wi-Fi, and 4G was published October 14, 2024, and a complete guide to signal jammers appeared August 23, 2023. A cell phone jammer article was published August 9, 2023. The older transformer-based builds still work, but the newer SDR and ESP32 approaches are where the community attention has moved.
Frequently Asked Questions
How does a signal jammer actually work?
A jammer transmits radio frequency noise on the same bands that phones, GPS, or Wi-Fi use, such as 700MHz to 2100MHz for cellular, 1575MHz for GPS, and 2.4GHz or 5GHz for Wi-Fi. That noise overpowers the original signal, blocking devices from sending or receiving transmissions. Advanced models use protocol jamming to disrupt control channels directly.
What parts do I need to build a simple jammer?
Common DIY builds use an Arduino or ESP32, an RF module such as a 433MHz transmitter or NRF24L01, a transistor for amplification, capacitors, an inductor, and an antenna. A basic cell phone jammer circuit also needs an RF amplifier, a voltage controlled oscillator, and a tuning circuit. SDR builds swap most of that hardware for GnuRadio and PlutoSDR.
Is it legal to build or use a signal jammer?
In the United States, the FCC states it is a violation of federal law to use or sell devices that intentionally block authorized radio communications like cell phones, GPS, police radar, and Wi-Fi. Many other countries also restrict jammers due to public safety concerns, and selling a device carries the same exposure as using one.
What frequency range can a homemade jammer cover?
A simple jammer circuit can block radio frequency signals between 5 and 10 meters and cover roughly 50 MHz to 1 GHz. Pushing it to jam signals from a 500 MHz range will most likely cause stability issues, and a 2-meter antenna can extend range to about 10 to 15 meters under good conditions.