A spectrum analyzer tells you what interference looks like, but pinpointing a jammer takes direction measurements and triangulation. Here is the field workflow I use, from wide-span sweeps to a confirmed location.
What Is RF Interference Hunting and Why Does It Matter?
RF interference hunting is the process of tracking down, identifying, and getting rid of a transmitter that's interfering with a legitimate radio service. From what I've seen, most hunts begin with a complaint rather than a spectrum plot — dropped calls in a certain neighborhood, a Wi-Fi network that dies every afternoon, or a GPS receiver that keeps losing its lock near one particular intersection. A spectrum analyzer measures signal strength across a range of frequencies, so an RF jammer tends to show up as elevated noise or some abnormal signal sitting on top of the normal traffic, as CRFS points out in its detection knowledge base.
Not all interference is the same, and that difference really matters once you're out in the field trying to track it down. What sets jamming apart from ordinary interference comes down to two things: intent and shape. A jammer isn't just some accidental byproduct of a crowded spectrum — it's a device designed to deliberately flood a receiver with energy in the exact band that receiver relies on. The classic breakdown sorts radar jamming into three types. Barrage jammers blanket the entire received band with interfering signal, basically drowning everything at once. Noise jammers are a bit more focused, using AM or phase noise modulation to raise the noise floor around the target. Deceptive jammers are the sneakiest of the three: they rely on a repeater or memory to create a replica of a radar return, so the victim sees a false target instead of obvious noise. Today's deceptive jammers lean heavily on DRFM, a technique that samples the RF signal, stores it digitally, and recreates it while tweaking parameters like delay and Doppler — which makes the fake return look disturbingly real. Figuring out which type you're dealing with shapes the whole approach you take to hunt it.
| Jammer type | Method | Effect on receiver |
|---|---|---|
| Barrage | Floods the whole received band with interfering signal | Overwhelms the receiver across the band |
| Noise | AM or phase noise modulation | Raises the noise floor around the target |
| Deceptive | Repeater or memory producing a replica of a radar return; modern versions use DRFM to sample, digitally store, and recreate the RF signal while modifying delay and Doppler | Creates false targets that appear real |
There's also a physical reason jammers punch above their weight. Jammer-to-radar path loss scales as 1/R2, while the radar return scales as 1/R4 — so a jammer gets a range advantage and doesn't need much power to be effective. That asymmetry is exactly why hunting matters: a low-power transmitter in a hidden location can degrade a wide area, and it won't look dramatic on a casual scan.
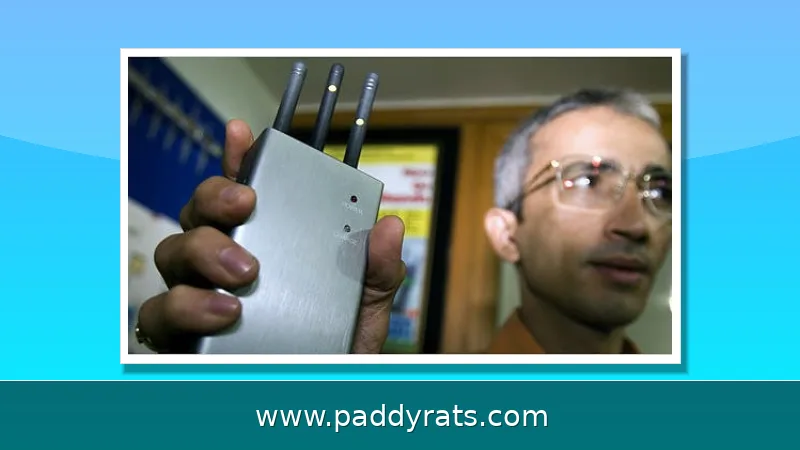
Compliance is the other half of the story, and honestly, it's the part most people skip when they're frustrated and just want the noise gone. In a lot of countries, signal jammers are banned outright — no exceptions. Here in the US, the FCC runs a dedicated jammer enforcement page where you can file a complaint by picking Interference and then Signal Jammers under Phone Issues. That said, it helps to know what you're actually dealing with before you report anything. Jammers that take down cellular service tend to be cheap, low-quality devices that just blanket entire cellular bands with noise instead of targeting anything precisely. That scattershot approach doesn't only mess with your calls — it can also interfere with public safety systems running on nearby frequencies, which is a big reason regulators treat these complaints so seriously. So if you do manage to track one down, don't go knocking on a neighbor's door or try to rip the thing out yourself. Document what you found, write down the frequencies and times, and hand it off to the regulator instead.
How Does a Spectrum Analyzer Detect a Jammer Signal?
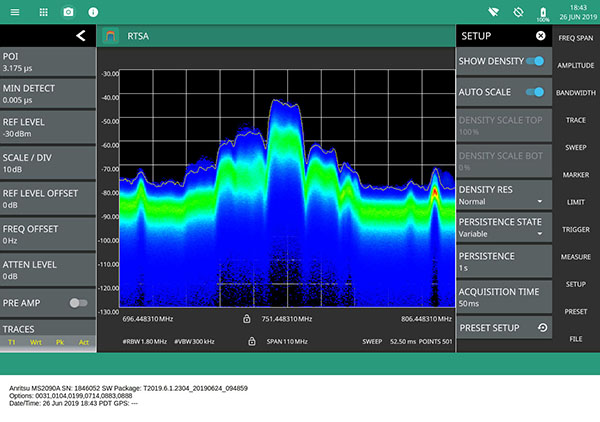
A spectrum analyzer sweeps across a frequency range and plots signal amplitude against frequency, which is exactly why it's the go-to instrument for answering the question of how you detect RF jamming. The real trick isn't just watching the display—it's comparison. Capture a baseline trace of the band while everything is healthy, then compare live sweeps against that reference. When a jammer shows up, it rarely looks like ordinary traffic. Instead, you'll typically see a raised noise floor across a chunk of spectrum, a flat-topped block of energy that just sits there, or an oddly stable carrier that never wavers the way legitimate signals do. Those signatures are your first clue that interference is present.
Start with a wide span. Keysight's spectrum analyzer guides recommend opening things up to locate the signal first, then narrowing the span for a closer look. Why go so broad at the start? Because a spectrum analyzer only shows you what's inside the window you've set. Dial in too narrow a span right away, and you could be staring at a perfectly clean slice of spectrum while the actual jammer sits 200 MHz away, quietly doing its damage. Sweeping a wide span first—say, the full range your analyzer covers—gives you the big picture, so any unexpected spike, hump, or raised noise floor jumps out against the normal signals around it. On a handheld unit like BirdRF's SignalHawk, which automatically adjusts attenuation, resolution bandwidth, and sweep time, that first sweep only takes a few seconds, so there's barely any cost to scanning the whole playground before you zero in. Once something suspicious catches your eye, that's your cue to narrow the span step by step until the signal fills the screen. Now you can actually read its frequency, power level, and shape—details that are nearly impossible to judge when the signal is just a tiny blip in a crowded wide view.
Channel Power and Occupied Bandwidth do most of the heavy lifting when it comes to characterization, and together they paint a pretty clear picture of what you're dealing with. Channel Power measures the total power within a bandwidth you set yourself, so it answers the simple question: how strong is this thing? Occupied Bandwidth tells you something different — how wide the emission actually is, or how much of the spectrum the source is eating up. Put the two side by side and jammer types begin to sort themselves out. A noise jammer usually shows a broad, flat occupied bandwidth with a slightly ragged top, which makes sense since it's basically dumping noise across the band to bury whatever's underneath. A deceptive or DRFM-based source looks nothing like that: it can come across as narrow and clean, often neat enough to pass for a legitimate signal, and you might not suspect anything until you watch it over time and realize the behavior doesn't quite add up. That difference is why characterizing the signal first matters so much — it determines how you'll go after the source later.
| Jammer type | Typical Channel Power / Occupied Bandwidth signature |
|---|---|
| Noise jammer | Broad, flat occupied bandwidth with a slightly ragged top |
| Deceptive or DRFM-based jammer | Narrow and clean; can resemble a legitimate signal until observed over time |
Signal-to-noise ratio ties the whole picture together, and it matters most in Wi-Fi, where a jammer may never appear as one clean spike. Instead, you compare current SNR readings against a known-good baseline captured when the network was healthy. A steady drop in SNR across the board—even when the interfering energy is smeared across channels rather than concentrated on one—strongly suggests something is deliberately drowning out the signal, whether that's a brute-force jammer or a stream of deauthentication frames. That's why it pays to learn Wi-Fi interference by its signatures. A microwave oven throws off wideband energy around 2.4 GHz, Bluetooth hops around 2.4 GHz, a wireless camera is a wideband continuous transmitter near 2.4 GHz, and a Wi-Fi jammer is wideband across both 2.4 and 5 GHz. Rather than staring at waterfalls for hours, you can let Ekahau Analyzer tag these interferers automatically, which saves you a lot of manual squinting.
| Interferer | Typical Signature | Frequency Band |
|---|---|---|
| Microwave oven | Wideband | Around 2.4 GHz |
| Bluetooth | Frequency hopping | 2.4 GHz |
| Wireless camera | Wideband continuous transmitter | Around 2.4 GHz |
| Wi-Fi jammer | Wideband | 2.4 and 5 GHz |
Step 1: Characterize the Interfering Signal
Before you head out into the field, take a minute to characterize the signal first. As BirdRF's interference hunting guide points out, technicians usually identify and characterize the interfering emission before they ever start collecting direction measurements from multiple locations with a directional antenna or Angle of Arrival technology. In practice, characterization just means jotting down the center frequency, the occupied bandwidth, the measured power level, and how the signal behaves over a span of minutes—not just a quick glance at a few seconds.
The behavior of the interfering signal matters far more than beginners tend to expect. A jammer that transmits continuously is a gift — you can walk right up to it with a single reading and never lose the trail. But a jammer that pulses on and off, sweeps across frequencies, or only switches on during business hours will send you in circles if you try to chase it with one snapshot. That's why I treat characterization as its own deliberate step rather than a quick glance at the display. I take timestamped screenshots each time the signal appears, and I jot down whether it drifts in frequency, how wide it looks, and whether there's any periodic rhythm to its behavior — say, on for a few seconds every minute, or only after 9 a.m. Those notes become a reference pattern. Later, when I'm standing somewhere with a directional antenna and wondering whether a bearing is real, that record tells me whether the reading lines up with the known behavior — or whether I'm just chasing noise.
How you configure the instrument matters more than most people expect, because the default settings that ship with an analyzer are rarely the ones that will reveal a jammer clearly. Small choices about resolution and span can be the difference between a vague hump of noise and a trace you can actually measure. For reference, NTIA’s measurement work on jammer characterization used an E4407B spectrum analyzer set to 1001 bins per trace, a setting that yields finer amplitude resolution across the span and makes weak or oddly shaped emissions easier to see. On modern field analyzers, automatic routines handle much of this for you: the SignalHawk line automatically adjusts attenuation, resolution bandwidth, and sweep time as you change span, which keeps the trace comparable from one measurement to the next. That consistency is a real advantage when you are walking a site and comparing readings, since otherwise you may end up chasing differences that come from your settings rather than from the jammer itself.
Here is the quick reference I keep for the first pass. It is not a substitute for your instrument's manual, but it keeps the sequence consistent between sites and between technicians.
Step 2: Take Direction Measurements with a Directional Antenna
A spectrum analyzer alone shows you what the interference looks like, not where it comes from. To get a bearing you need a directional antenna, a Yagi or a log-periodic for lower bands, or an integrated direction-finding system. You point the antenna, rotate until the signal peaks or nulls, and record the bearing along with your own position. Repeat that at a second and third location, and the geometry starts to close in on a source.
Angle of Arrival technology shortens this process considerably. Instead of manually sweeping an antenna, an AOA-capable analyzer computes the direction the signal arrives from and displays it on screen. BirdRF's SignalHawk is a good example of the integrated approach: the SH-60S-AOA covers 9 kHz to 6 GHz, the SH-75S-AOA extends coverage up to 7.5 GHz, and the display average noise level is -169 dBm/Hz typical with the 40 dB preamplifier engaged. The 5.5-inch sunlight-readable display matters more than it sounds when you are standing on a roof at midday.
Traditional spectrum analyzers tell you what interference looks like but not where it comes from, which is the gap these combined units were built to close. In practice I still take bearings from at least three well-separated points, because multipath in urban environments can throw a single bearing off by tens of degrees. Reflections off buildings and water towers are the usual culprits.
Position choice is a skill of its own. Avoid taking two bearings from points along the same line relative to the suspected source, and avoid standing right next to large metal structures. A wide baseline with roughly perpendicular crossing angles produces a much tighter intersection than three readings clustered within a hundred yards of each other.
Step 3: Triangulate and Pinpoint the Jammer Location
Triangulation is the payoff step. With bearings from three measurement points, you draw lines along each bearing and look for the intersection. Two bearings give you a point but no error estimate; three give you a triangle, and the size of that triangle tells you how much to trust the result. If the triangle is large, take a fourth bearing rather than guessing.
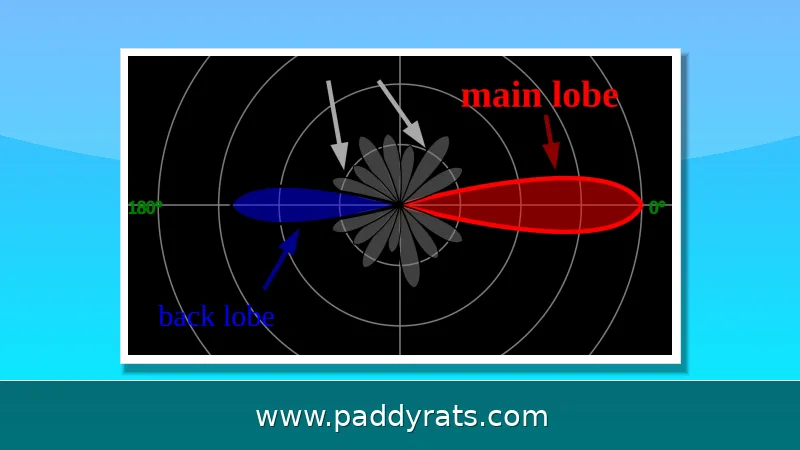
As you approach the source, the method changes. Bearing accuracy improves, but so does the effect of reflections, and a strong signal can leak into the antenna's sidelobes and mislead you. I switch to body shielding at close range: hold the antenna against my chest and watch how the amplitude changes as I turn, which gives a coarse but reliable sense of direction within a few dozen yards. Attenuators help here, since a saturated front end produces a flat, uninformative trace.
Once you have a candidate location, confirm it by watching the signal level rise and fall as you move a few steps in each direction. A real jammer produces a smooth, repeatable gradient. A reflection produces a sharp peak that vanishes when you move a foot. This confirmation step is where most false positives get eliminated, and it is also where a cheap analyzer with a poor noise floor starts to hurt you.
After confirmation, the job becomes documentation and escalation. Record the location, the measured parameters, photographs, and timestamps, then hand the package to the relevant authority. In the United States that means the FCC's jammer enforcement process; elsewhere, the national regulator typically handles it. Attempting to disable or confiscate a transmitter yourself creates legal and safety exposure that is not worth taking.
What Equipment Do You Need for Jammer Hunting?
The minimum kit is a spectrum analyzer that covers the bands you care about, a directional antenna, and a way to record bearings and positions. Everything beyond that is convenience, ruggedness, or accuracy. The comparison below reflects the tradeoff I see most often in the field: a general-purpose analyzer plus a separate antenna versus an integrated direction-finding unit.
Price is a poor proxy for capability here. Spectrum analyzer prices range from cheap to ridiculously expensive, and as RadioReference forum regulars point out, the bigger issue is knowing how to operate and interpret the instrument. A skilled operator with a mid-range analyzer and a good Yagi will out-hunt a novice with a lab-grade unit every time. Budget for training and practice time, not just hardware.
For Wi-Fi-specific work, software complements hardware. The Wi-Fi Jammer Detector app detects jamming and deauthentication attacks, but it requires a purchased detector connected to the main router over a wired connection, so it is not a phone-only solution. Ekahau Analyzer and Sidekick serve a similar role for enterprise wireless teams by tagging interferers on a floor plan, which turns a spectrum problem into a map you can walk.
On the hobbyist end, HackRF One is a popular software-defined radio for observing and recording suspicious emissions, though it is not a calibrated measuring receiver. Keysight's PXI platform, which includes a preselector and a 26.5-GHz vector signal analyzer, represents the opposite end of the spectrum for lab-grade characterization. Match the tool to the question you are actually asking.
Can You Detect a Jammer Without Specialized Gear?
Partially, and it is worth being honest about the limits. A phone or laptop can reveal symptoms, such as a cellular signal that drops to nothing in one room or Wi-Fi that fails only near a particular wall, but symptoms are not measurements. Without a spectrum view you cannot distinguish a jammer from a dead spot, a misconfigured access point, or a failing radio.
The common household question, how to check if someone put a jammer in my house, usually resolves into a physical search plus a spectrum check. Look for unfamiliar powered devices, unexplained antennas, and anything warm to the touch that nobody remembers installing. Then sweep the relevant bands with an analyzer and compare against a baseline taken outside the building. If the noise floor inside is dramatically higher across a whole band, that is a strong indicator.
For cell jammers specifically, the signature is broad. A cheap cellular jammer blankets entire bands with noise rather than targeting a single channel, which is why it also degrades public safety systems on adjacent frequencies. If your phone shows full bars but no service, or service returns the moment you step outside, that pattern is consistent with jamming rather than a network outage.
Detecting jamming in Wi-Fi networks follows the same logic. Measure SNR, watch for deauthentication floods, and correlate the timing with the interference. If the disruption appears only during certain hours or only in one physical area, you have a lead. If it is constant and building-wide, start with your own infrastructure before assuming a hostile transmitter.
What Are the Legal and Practical Risks?
Signal jammers are illegal to operate in many countries, including the United States, and enforcement is not theoretical. The FCC's jammer enforcement page exists because consumers and businesses file complaints about jamming that disrupts cellular, GPS, and public safety communications. Selling or importing jammers is also restricted in many jurisdictions, which is why legitimate units are sold for testing and shielded environments rather than general use.
There is a practical risk too: jammers do not discriminate. Because they blanket bands with noise, they interfere with any receiver in range, including emergency services, aviation systems, and your own equipment. That is the main reason regulators treat them as a public safety issue rather than a nuisance.
If you are the one testing, work inside a shielded enclosure or with a conducted setup rather than radiating. Rohde & Schwarz maintains jammer testing resources covering DRFM and system-level evaluation for exactly this reason, and doing that work over the air invites both interference complaints and legal trouble.
For everyone else, the responsible path is measure, document, and report. Keep your logs, avoid confrontation with whoever installed the device, and let the regulator handle removal. The technical hunt is satisfying to complete, but the outcome that matters is a clean spectrum and a functioning service for everyone nearby.
Frequently Asked Questions
How do you detect RF jamming with a spectrum analyzer?
A spectrum analyzer measures signal strength across a frequency range, so an RF jammer appears as elevated noise or an abnormal signal blocking normal traffic. Search the correct band and channels, then compare readings against a baseline to confirm interference.
How do you pinpoint the physical location of a jammer?
Use a spectrum analyzer with a directional antenna, then take direction measurements from multiple locations. Collecting readings from three points lets you triangulate the source. Angle of Arrival technology can also determine the direction the signal comes from.
Can a spectrum analyzer alone find a hidden jammer?
A spectrum analyzer shows what the interference looks like but not where it originates. You also need a directional antenna or direction-finding capability, plus measurements from several positions, to physically locate the jammer.
What equipment is needed to hunt a signal jammer?
You need a spectrum analyzer covering the relevant bands, a directional antenna, and optionally Angle of Arrival direction-finding. Some field analyzers, such as SignalHawk, combine spectrum analysis and AOA in one ruggedized unit.